A bit about backs and backbending.
Since you've decided on starting practicing yoga contortion a lesson about backbends would be in it's place. I know that you will be most interested in this subject because it is the one part of your body that you might see as a bit of a mystery.
I'll start with what I have seen and some comments on that, then move to training methods and finally the sort of exercises you can expect to be given to get your back very supple.
The best way to explain all this is to make use of photos of actual people.
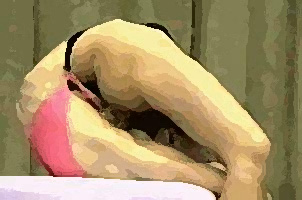
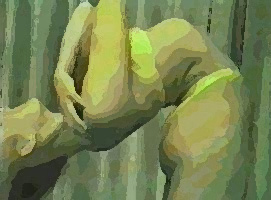
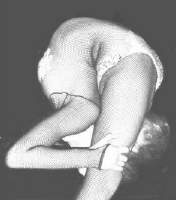
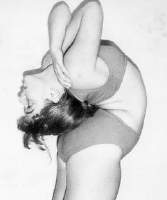
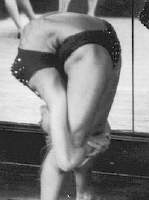
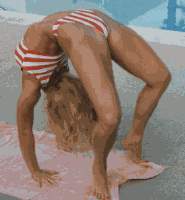
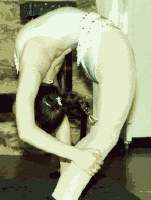
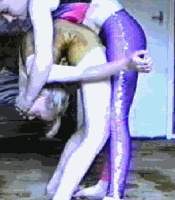
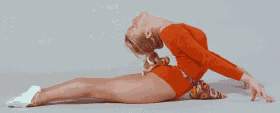
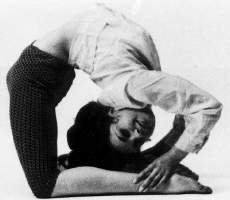
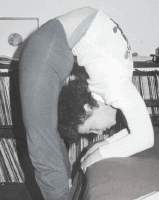
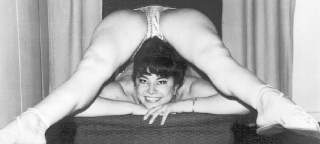
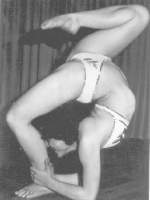
Picture A
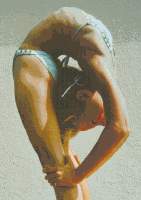
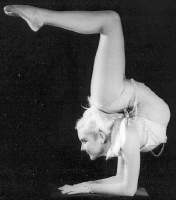
The girl has a bendy back is what you will say. Correct. Look closely, however, and you will find that the back is bent over a large number of vertebrae. The bend even continues to the vertebrae behind the rib cage and the front of the body has a very smooth curve. A number of vertebrae have each moved a small angle to give this smooth curve to the back and this looks elegant (in my view). This bend resulted from the girl grasping her knees with feet relatively close together and tilting the head back to look at the floor and pulling the head in to be against the seat/thighs.
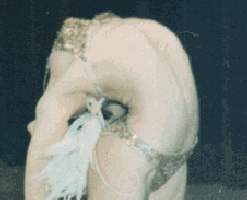
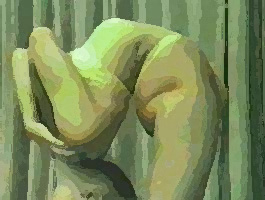
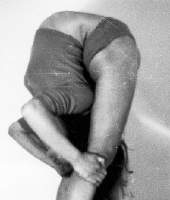
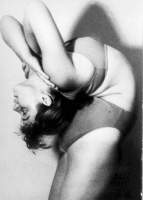
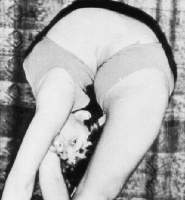
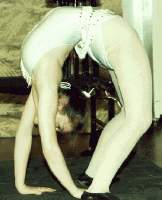
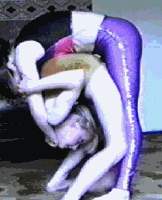
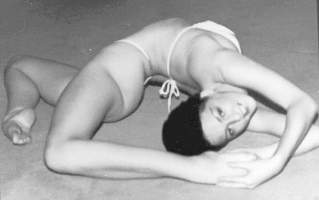
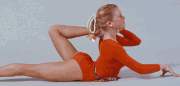
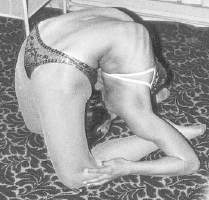
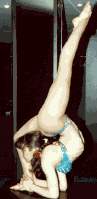
Picture B
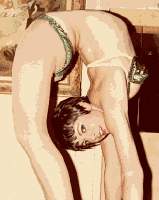
Here is a significantly different feature from A. Notice that the back no longer has a good curve to it. The bend is taken by a few vertebrae in the lower back region. The upper back behind the rib cage is almost straight. There is a reason. She has bent back to get her hands to the floor. She has not pulled her head in to her thighs but has reached downwards. She could have pivoted more at the hips, but has simply allowed a small number of her back vertebrae to bend much more. The way she went about the pose kept the upper back straight.
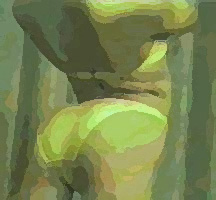
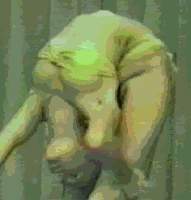
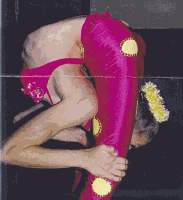
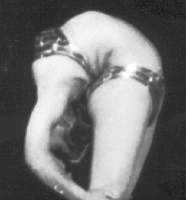
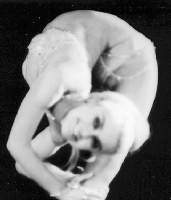
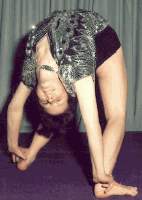
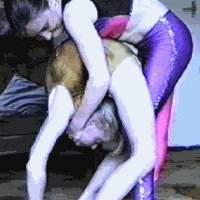
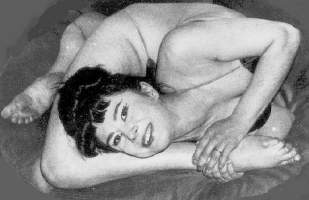
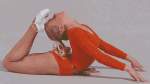
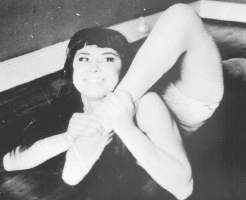
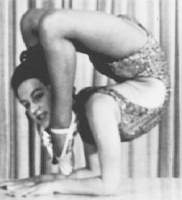
Picture C
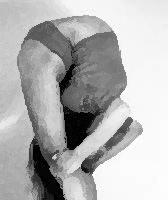
Here is a classic demonstration of a close bend. It is a tighter bend at a few vertebrae in the lower back area than B but the upper back is straight and the rib cage has no bend at all. This pose would have started out in the same way as B but she wanted her head through her thighs. She has hold of the legs at the knees and has pulled in from picture B position. Notice that her hips have pivoted more. As well, the few vertebrae taking the bend have had to get a greater angular movement than in picture B. It is not possible to get a tighter bend because her seat is hard against her back.
The flexible back has a great capacity to bend at various vertebrae. It is obvious that the easiest part to bend is the lower back because there is no restriction. The further up the back one moves, the rib cage starts to limit angular movement.
What do we learn from this? Somewhat obviously, the back can become exceptionally flexible and can produce a graceful bend. It is possible for vertebrae to move to extreme angles during a bend. I should point out here that the positions above are all standing back bends. There is a requirement to retain balance to stop from falling over and, as you can see in B, a good deal of muscle control is required.
Of course, on the chest or elbows the back simply bends where it wants to be comfortable. I will explain why I make that statement.
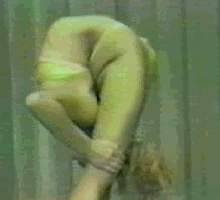
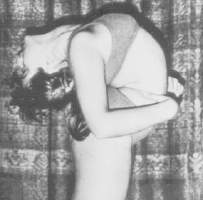
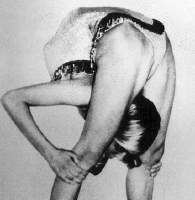
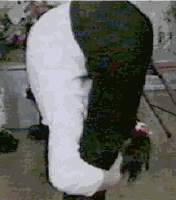
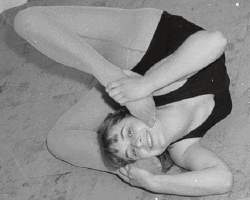
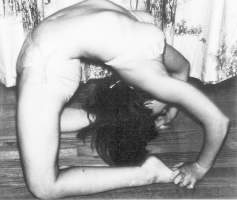
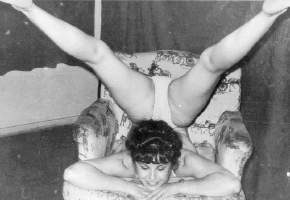
Picture D
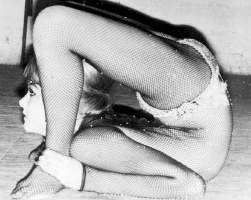
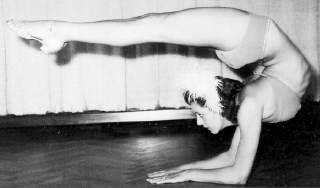
Here the contortionist has her chest on the floor and has dragged her feet in to the shoulders. The more of her body that is on the floor, the more comfortable she is going to be. The lower back vertebrae have provided the considerable angular movement to achieve the pose. There is no balance requited as in a standing pose so the back relaxes into where it is most comfortable.
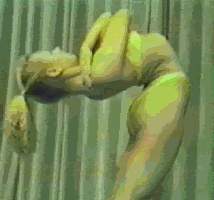
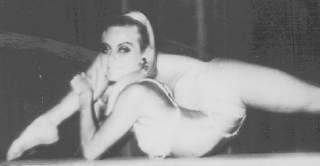
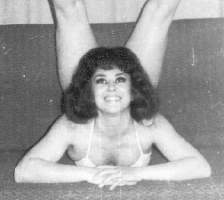
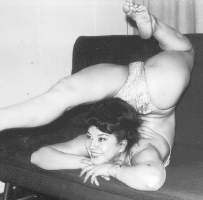
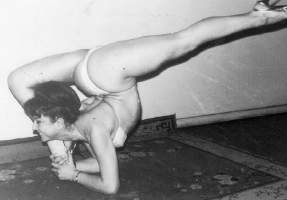
Picture E
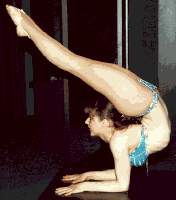
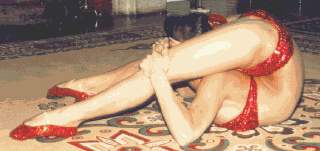
Picture E has some similarity but here we see a layover and this is interesting. The contortionist is on the table and her weight is taken on the chest above the breasts. Only a small part of her body is resting on the table. In this picture, because the legs are hanging her back has not taken up the bend as at picture D. Something very interesting has happened! Notice that the bend has moved to higher vertebra to allow the legs to pull the seat towards the floor! So her back has simply taken up the bend at the most comfortable part of the back by providing angular movement of a few, but different, vertebrae.
Picture F
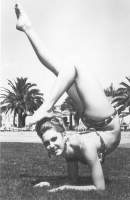
Picture F shows a contortionist with an interesting bend. There is angular movement low down the back but she also has movement of the vertebrae higher up at the ribcage area.
Conclusion.
When the back becomes more and more flexible it will adapt to the requirements of the position the contortionists gets herself into. It will not modify the vertebrae angles if the contortionist maintains strict muscular control of her body. When there is relaxation of the muscles, however, the back will take the bend at the most comfortable vertebrae for the occasion. It is more difficult to bend the back at the rib cage area and a great angular movement at these vertebrae can not occur. It is relatively easier to bend the back at the lower vertebrae where quite large angular movement between vertebrae can be achieved.
A standing back bend showing progression in 6 pictures.
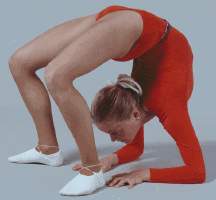
Picture G
In picture G the contortionist has pivoted forward at the hips. As she is doing this she arches the back. This keeps her weight over the feet which are providing balance.
Picture H
At picture H she has allowed the lower back to take all the bending movement as she continues the bend and she has controlled her upper back which is straight. To retain balance she has swayed forward with her hips.
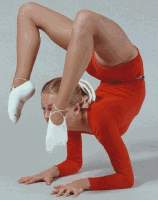
Picture I
Picture I shows the upper body still straight and this is due to her control. The lower vertebrae continue to absorb the bend by increasing the angular displacement of a few vertebrae. The vertebrae that have produced the "bend" have managed considerably better than 90 degrees of angle over a very few vertebrae. The back is an amazing part of your body structure to be able to do this – but it does it as you bend your fingers in extreme ways! Now, on with the next three pictures.
Picture J
Continuing with the bend she now pivots at the hips as shown in picture J and brings the head down to behind the thighs. Notice that her legs are more erect because the body weight has closed up towards the legs.
Picture K
As is often the case with a back bend picture K shows her grasping one leg just above the knee without increasing the bend that was there at picture J. Having grasped one leg she has a stable base and can now grasp the other leg and then pull her body in to the final position at Picture L.
Picture L
Things to note about picture L are that her head is well down the thighs with the shoulders about mid way between seat and knee. That means the bend has been taken by a few low back vertebrae. The original straightness of the upper back remains unchanged from the earlier pictures. Her seat is firmly against her back towards the bottom of the rib cage. Holding the legs just above the knees tends to lock the legs. Grasping below the knees would have allowed the knees to bend more easily.
This was a classic entry to a perfect back bend with the head between the thighs. You'll be able to do this in
time if you practice!
Now a few different positions with comments!
Picture M
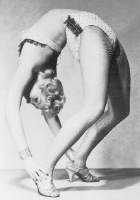
Picture M shows the head well up and the position of the shoulders against the legs is only just below the seat. The vertebrae taking the bend angle are relatively high in her back.
Picture N
Picture N is really impressive as well. The contortionist has her bend at the vertebrae in the lowest part of her back. Lower than picture M. Her shoulders are definitely lower down the leg than M.
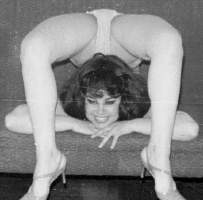
Picture O
Picture O is interesting. Firstly the girl has a thick ribcage and while there is a bit of rib showing the girl is not too thin. But she has very little in the way of padding on her seat! The back has a wonderful bend but the lack of a seat means that it is unusual. What is more, the pose does not look as tight because she has insufficient seat to make contact with her back.
So this is the backbend. It is one of the classic contortionists positions because, while most people can bend down and touch their toes to the front, very few people can do a back bend. But,the back and its vertebrae can bend a lot. Even more than you
ever can imagine. Several adjacent vertebrae can each achieve a considerable angular movement to give what almost seems to be a broken back appearance. Contortionists exercise to make greater the angular movement of their joints so allowing then to adopt positions that others find
amazing. Hopefully this insight and explanation will enlighten you a bit about the capacity a back has to achieve great angular movement of the vertebrae through exercise. This knowledge will, in turn, give you the confidence to relax when bending your lower vertebrae into a back bend and will allow you to bend your own vertebrae to a greater angle than you previously thought possible.
Now for another back bend. This time a different entry style.
Picture A
For her entry into the back bend (Picture A) the girl has pivoted forward at the hips. This is always a good start to retain balance. At this point I should say that a back bend should not be hurried. It should always be a movement performed with deliberation and slow movement. The back is deeply arched, and the vertebrae give great angular movement at the lower back. The head is tilted well back until the back of the head comes up against the seat. This is a locked position where there is stability.
Picture B
From this position the hip pivot is lessened progressively (Picture B) but the back kept arched. As the pivot is reduced the head slowly slides down the contour of the seat and the hip pivot slowly disappears. The bend in the back is kept as tight as possible and with this movement different vertebrae change their angular movement as the bend progresses.
Picture C
Picture C compared to A & B will show this action.
Picture D
The legs are now grasped at the knee as Picture D to give a steady base and pivot action at the hips bring the shoulders down well below the seat. The arms are then used to pull the bend in until the shoulders contact the back of the legs and the seat is against the back.
Picture E1
If the feet were reasonably apart for this bend then the head will be through the thighs as at Picture E. In this position there is a reasonable amount of pull force on the arms and hands and another option may be preferred as follows.
Picture F1
If the feet were nearer together for the bend, from Picture D position and the subsequent hip pivot took place the arms may be clasped in front of the knees and the head is against the back of the knees as picture F. Once the hands are clasped there is no pull on the arms. (But there is more to come!!).
Picture E2
This is an alternative continuation from Picture D. From the D Picture position the hip pivot takes place and one leg only is grasped at the knee. See Picture E2.
Picture E3
Holding the one leg, the pull in brings the head outside the leg and the lower back vertebrae now have an angular movement to the side as well as to the rear as the head takes position as Picture E3. After a pause holding that position, the inside hand transfers to the other leg. The head is now taken from outside one leg across the back and pulled to outside the other leg.
Picture F
Following that, the head is returned to center as previous picture E1 or F1. This is very interesting in that the girl has pivoted at the hips to an amazing extent and her head is between her knees. The back bend is good but it is the hip socket movement that is impressive.
Standing back bends
The standing back bend is not an easy pose to get yourself into. The problem with it is that you are standing and then instead of forward bending which is natural you must reverse the bend. For forward bends the shape of the foot provides good leverage to maintain balance. The leg goes down to the foot and then the toes are some distance ahead of the leg pivot point. Any tendency to overbalance is corrected by pressure on the toes.
During a backbend the tendency to go off balance cannot be corrected easily because the toes point the wrong way. As you commence a standing back bend you must, therefore, make sure that the body is maintaining pressure on the toes by slight overbalance forward. This is the reason for pivot forward of the hips at the initial stage of the bend. It is fair to comment that the brain senses the need for forward balance and tends to tense up muscles in case of problems with this un-natural action.
It is for that reason that I never attempt to teach a standing backbend until the trainee has an exceptionally supple and therefore confident back bend. I know that others teach back bends far too early (in my opinion). I will show the effect.
Bad Training Technique
Picture G1
This would be an often taught way of entering a back bend. First, to a bridge as Picture G1;
Picture G2
then walk the hands to the feet as picture G2;
Picture G3
then grasp the ankles as picture G3. All very difficult and every part of the way there is strain. The coach expects the girl to increase her back flexibility by tightening the bend from this position. This is a big ask.
Picture G3a
Then what comes next? The girl has a fragile hold on her ankles and little stability and not great back flexibility as picture G3a. To try to increase flexibility the coach sets the task of getting the hands up to the knees so that the bend will become tighter.
Picture G4
The poor girl has to work the hands up the legs using finger action one hand at a time as picture G4 and all the time with bent knees because her back is not that flexible.
Try standing with the knees bent and see how much work you must do to stay balanced. Now imagine that you were in a back bend with knees bent. A totally unbalanced position with a tense body. So, the inevitable happens.
She falls over, injures herself or...
Picture G5
Because of lack of progress (which is understandable) the coach determines that he will help out the student by grasping her body and holding pressure on her back. The girl now has the legs more straight because coach is taking a lot of the weight. The girl can relax because coach is holding her and will not let her fall so she can work her hands higher up the legs as picture G5.
I do not think this style is any good at all and will tell you my method later.
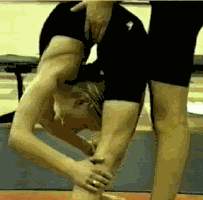
The totally assisted method of teaching a back bend!
Picture H1
Picture H2 Picture H3
This is an actual series of pictures (H1 through H3) of one method a coach uses to get the trainee contortionist into a back bend. The girl does a loose bridge and is forced into the positions. When she is pulled into the position the coach wants the girl is told to hold position and is let
go, something that the assistant never should do.
In my opinion this is a training method that does not produce confidence and is totally incorrect. To me it is vitally important that the contortionist trainee gets there in a much more friendly manner and I will tell you all about what I shall get you to do to achieve much better and quicker results.
Not earlier than then the assisted stretching should commence.
The back is a complex part of the body. But, not only is it complex, it has an amazing ability to bend. This is achieved by angular change between adjacent vertebrae. That angle change can be in any direction and can be considerable. It is the muscles in the back that control any angular change in vertebrae.
Our training methods.
For us it is important to have the trainee in positions where there is minimum strain and this will always be in a comfortable position where there is a minimum balance requirement. As confidence grows and flexibility improves more complex positions will be within the capacity of the student. It is important to stay away from difficult balance positions at the early stages.
Initial back bending training
There are two individually different starting positions and they may be used alone or used in combination. Some trainees can more easily do one of the start positions than the other and in this case it is far better to simply do the easy one for a time until confidence has grown and the other position introduced. The two starting positions are:
On the floor lying on the side
On the floor lying on the tummy
In both of these positions there is no balance required and since both are on the floor the student has no fears about falling over.
They can also be carried out assisted.
Exercise lying on the side.
This exercise could not be simpler. The student is on the floor on her side and does the exercise positions that follow.
Position LBB1
Position LBB1 is the start position and the student is in a comfortable position on the floor with legs spread for stability. One foot is grasped and pulled to tighten the bend.
Position LBB2
As the back gets more flexible the foot can be pulled over the shoulder (LBB2) and as this occurs the face slides along the outside of the leg. Repeats are done and leg pulls are done with each leg. Once the leg passes the shoulder it is time to introduce a minor change in the exercise because the back is getting more supple and this needs to be exploited.
Positon LBB3
LBB3 is the third stage of this exercise and the contortion trainee grasps both feet at the same time and pulls both feet down over the shoulders. Once she can get both feet to her shoulders there is little value in continuing this exercise.
On the floor lying on the tummy.
Again, this exercise could not be simpler. The student is on the floor on her tummy and does the exercise positions that follow.
Posiotion TBB1
Position TBB1 is the start and the student arches the back, assisted by the hands pushing.
Position TBB2
The feet are raised as TBB2 and the student tries to get the feet to the shoulders.
Position TBB3
When this is achieved she can progress to TBB3 where she will be able to grasp each foot (one at a time) and pull it. Eventually the back will become more supple and the student will get the foot over the shoulder at which time a new exercise providing a challenge needs to be given.
Once the student is able to easily get each foot over her shoulder doing either the side back bend (SBB series) or the tummy back bend (TBB series) it is time to change and provide a greater challenge. SBB and TBB may be given at the same time to provide variation.
Intermediate back bend training.
To start on this training the student must be able to do SBB and TBB and get both feet to the shoulders at the same time. The heels of the feet must actually be in front of the shoulders or the next exercises will be rather difficult. This intermediate training comprises two different exercises:
Kneeling on the floor with a backbend
On the tummy with backbend
Kneeling on the floor and back bend. Being a kneeling pose any backbend will cause no overbalance difficulty so the student will be quite confident and, therefore, relaxed about the position. The vertebrae will be achieving big angular change during this exercise.
Position KBB1
At position KBB1 the student kneels, legs apart and backbends to grasp the feet. At that point there is total stability so the student can relax in confidence.
Position KBB2
The exercise is to move the head towards "between the thighs" and as flexibility is improved the student will be able to get the hands to the ankles as at position KBB2.
Position KBB3
With more and more exercising the student will be able to relax while doing this bend because there is no balance required and the base is extremely stable. As practice in this exercise is gained, the vertebrae will achieve greater angular deflection and the bend will tighten significantly. This will allow the student to move the hands further and further along the legs towards the knees as KBB3. In time the hands will be able to grasp in front of the knees.
On the tummy with backbend.
This is a continuation of the On the floor lying on the tummy exercise TBB but is more advanced.
Position ATB1
Previously the student was able to get the foot to the shoulder. Now that foot is grasped and pulled down towards the floor as ATB1.
Position ATB2
The rear leg stays stretched to the rear and the toes of this foot should remain in contact with the floor. As the student becomes more flexible in the back the front foot will touch the floor as ATB2.
Time to move on
By this stage the student has a back with good flexibility and a new exercise is introduced - the layover.
Again, the exercise does not require balance as it is done on the chest. This allows relaxation by the student and the ability to achieve much greater flexibility.
Layover from chest on chair or couch.
The aim is to achieve the maximum back bend. This will be achieved from a comfortable chest position on a comfortable base. The legs are allowed to drape over the shoulders and the natural weight of the legs and seat tighten the bend.
Position CLO1
Entry to start position is achieved by a simple back bend to the chair (or couch) as at picture CLO1. Early in the bend contact with the chair will be made by the hands and they take a support role getting into the start position.
Position CLO2
It is important that the student gets properly into the start position and she should wriggle herself (position CLO2) until the exact position of chest, chin, arms and hands for the start position is achieved.
Position CLO3
The start position is seen in CLO3. Note that the chin is on the seat of the chair as are the hands and that the hands are just in front of the chin. The arms are in a position where they are providing maximum support to stop any forward roll off the chair. This position is another "comfort zone" one. I have deliberately chosen a furniture item that the student will know well. Its surface is soft and comfortable and it is relatively low to the ground. No balance is required and the student will be able to relax while doing the exercise part.
Position CLO4
Bring the legs over as in position CLO4. The toes can be pointed and they should touch the floor. While most seats are low enough to allow this an unusually high seat and student with short legs may need suitably sized cushions placed on the floor so that the toes can touch this and take load if needed because this is the "rest" position.
Position CLO5
Both legs are then raised as in position CLO5 and the bend in the back tightens.
Position CLO6
From this position one leg is brought back into position as shown in position CLO6 and then returned to position as CLO5. Then the other leg is taken through the same motion. This continuously performed "cycling type" motion will tighten the bend considerably and after the specified number of cycling actions the student returns to the rest position as in CLO4.
This exercise will have a large number of repetitions resting in CLO4 between them. As the student does more and more of this exercise she will start to feel her seat make contact with her upper back from time to time.
At this stage she will be able to relax and if she allows the weight of the legs and seat to take over while in the position of picture CLO4 she will, in time, be able to get her seat to touch her own back and rest in the position.
This exercise will have prepared the back for any tight bending. Now that the student is very flexible in the back it is time to introduce other positions where some balance is required. For example, a standing back bend would now be introduced because the back is supple and only the standing balance will be new.
Utilizing the elbow stand for back bending.
Although a hand stand requires considerable balance a stand done on the forearms (elbow stand) is relatively easy. The elbow stand is a very useful balance position because considerable back bending can be carried out in this balance.
Position for an elbow stand.
Position EST1
The best initial position to get started with an elbow stand is shown in position EST1. It is entered from a backbend to hands dropping to elbows. Note that the elbows are a little wider apart than the shoulders and the forearms are on the floor with the fingers spread and flat on the floor. The upper arms can be vertical or a little off vertical depending on the position of the body. The feet are firmly on the floor.
Position EST2

Now raise the head and arch the back while you lift onto tiptoes as picture EST2. The toes will be taking very little weight at this stage. Raise the head a little more and the feet will come off the floor.
Position EST3
The position EST3 should be held. For a start the feet will return to touch the floor but the aim is to remain on the elbows without feet contact and this balance will quickly be mastered.
A few elbow stand positions in combination with back bends
1. A simple exercise.
Starting from EST1. Bring one foot back to the hands and grasp it with both hands. This is still a very stable position because the two elbows and foot make the base triangle.
Position SX01
Raise one foot from the floor bending the knee and getting to position SX01 ..
Position SX02
Raise the leg to vertical pointing the foot as position SX02….
Position SX03
Now bring the leg rearwards towards the floor to the equivalent of the splits position. SX03…
From the SX03 position return the leg back to alongside the other foot on the floor.
In reality, this is not very much of an elbow stand balance because there is always the foot on the floor as the triangle base and this makes the position very stable. The exercise is, however, a good starter to more difficult elbow stand exercises. The higher you raise the head the tighter will be the back bend. It is also possible for a girl with a good over split to touch the floor with the toes of the rear foot.
2. Another simple exercise.
Starting from EST1. This time raise both feet off the floor at the same time.
Position SX11
See position SX11. For a start this may be more easily done if the feet are brought in so that they are against the head. This provides a little easier balance. At this stage you have a true elbow balance because the feet are off the floor and the balance is achieved from the elbows along to the hands.
Position SX12
Slowly raise the feet while maintaining balance and have the legs parallel with the floor as position SX12.
Position SX13
Continue to raise the legs higher as in position SX13.
Position SX14
Now you can bend each leg in turn so that the foot touches the head as in position SX14.
Position SX11
Return the legs to the floor by bringing them down alongside the face as in position SX11 on the way to the floor.
3. A more advanced exercise.
Position EST1
Starting from EST1. This being the normal start position.
Position AEX32
Grasp one foot then raise the head reasonably high and this will tighten the bend then raise the other leg to the vertical as in position AEX32.
Position AEX33
Let go the foot and bring this leg up to the top leg but to assist the balance bend at the knee as AEX33.
Position AEX34
Finally, bring the feet down to parallel the floor and sit on the head as the back bends more and more as AEX34. Return the feet to the start position.
You have seen some of the lovely results that you will achieve following the exercises of this program. If you only follow them correctly and exercise much daily you will be able to get into the position below.
That is going to be your progression in loosening up your back. Note that there has not been a standing backbend or anything requiring balancing. That will come later.
Now let's start training