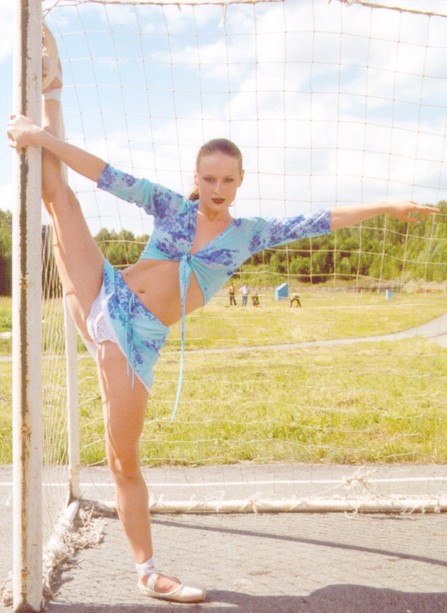
Splits
Important notice! If you have suffered from one or many dislocations in either hips or shoulders you should learn to do controlled dislocations. This often is a symptom of hypermobility and you will sooner or later dislocate again. A medical term for this is Ehlers-Danlos Syndrome, but often this disease is missed by most MD’s unless it’s mentioned. Around 40% of the population has Ehlers-Danlos Syndrome and often without knowing it. The symptoms are often pain in joints, hypermobility and dislocations of the joints (for example if you can learn how to do a split in a short time, partially dislocate your shoulders - that often means that you will hear a popping or cracking sound - or if you have overbent elbows you most likely have Ehlers-Danlos Syndrome). Very often the symptoms show gradually, often with pain or dislocations, and increase with time to states that aren't controllable. It's not a question if it happens, but when. To prevent this it’s important to learn to do controlled dislocations, build up strenght and flexibility around all joints and practicing yoga and contortion does all this. The reason is simple. If a symptom like a dislocation occurs and it isn’t controlled your muscles will go into spasm. Being able to do a controlled dislocation prevents this and it should be done many times on a daily basis. A controlled dislocation is a dislocation where you are able to dislocate the joint, move the limb with the help of another limb or with help from someone that assists you and then putting it back to it's normal state. All joints that can be dislocated must be trained in this order of fashion and the controlled dislocation must become a part of your normal range of movement! It's important to train all joints that dislocate, because that you once had an uncontrolled dislocation in i.e. the hips doesn't mean that the next won't be in the shoulders etc and the dislocations gradually worsens for each time making it impossible to control them in the end. You should work the same way with backbends and later backfolds since the dislocations tend to spread to other areas than the joints around the limbs. When working on backbends and especially backfolds put a stick, a finger or something appropriate to increase the fold and partially dislocate the vertebrae. The last part is very important! Using the contortion barre is recommended. Persons that have experienced or experiences symptoms like dislocating, pain in joint and hypermobility should work towards being able to do all of the program to perfection, as a prevention, to be able to get the joints and the muscles around the joints supple to the outer limit and learn to control them in situations like this by doing controlled dislocations as much as possible. Also all exercises, if possible, should be done assisted with firm stretches until the maximum suppleness is reached at least once each day, preferrably more! This might be difficult, uncomforable and even painful, but only in the beginning. It’s not as difficult as it sounds and that is something you’ve probably found out by now or will.
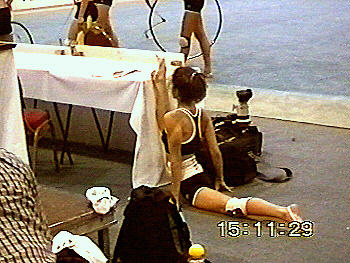
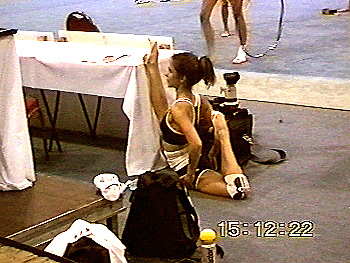
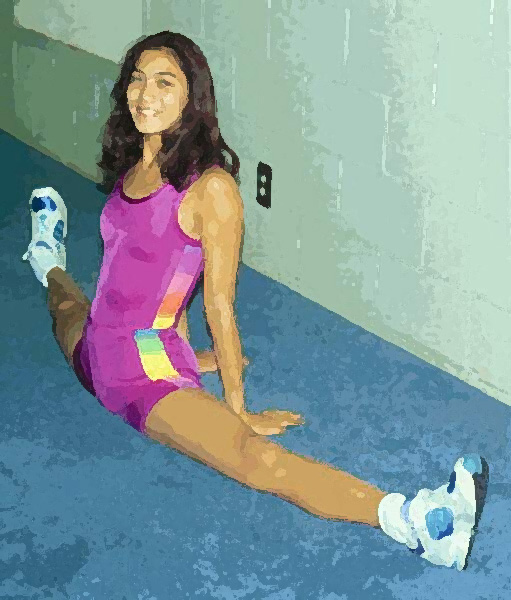
Exercise 1
Splits prepairing.
For this exercise, since you’re starting to do the splits and will need to have a good steady foundation you should take the weight on the hands and lean forward so the hands are on the floor about level with the front leg knee. The rear leg should have the foot turned out so that the side of the foot is taking the weight. (Better balance!) You should drop down to a comfortable position and then to a 1-2-3-4-5 count, bounce towards sitting on the floor and the hands still take a lot of the weight. Change legs (other to the front) and do the 1-2-3-4-5 bounce. Repeat the exercise until you have done 15 left leg front and 15 right leg front.When you are as low as you can get into your splits, tension your leg muscles tightly, like you would if you were trying to stand up from the splits, hold the tension for 30 seconds and then relax the muscles completely. When you relax you should find that you are sliding down a bit further. Always do at least 15 repeats each leg of this for each time you are practicing your splits. Be patient! When you're able to sit in the splits do that it as often as you can. Practice 2-3 times every day. When watching TV, do the splits during the commercials. That makes great 5 minute splits. If you like to continue after the commercials too. In the end you'll find that you can sit in the splits as long as you wish. If you like to you can apply this method as far as you advance since it will help you to stay longer in all split positions.
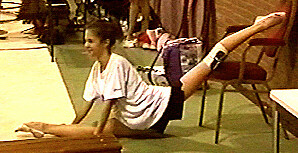
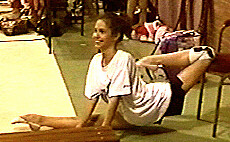
Exercise 2
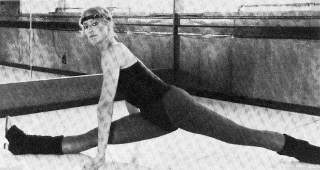
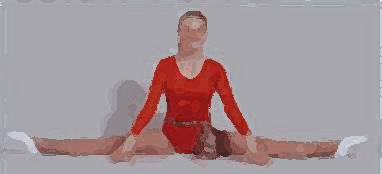
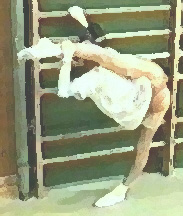
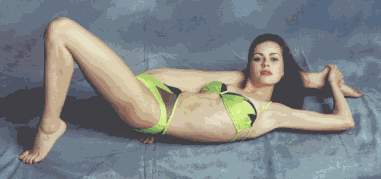
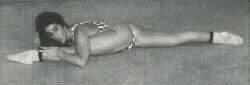
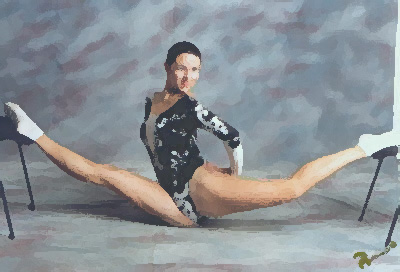
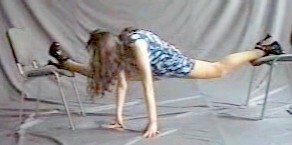
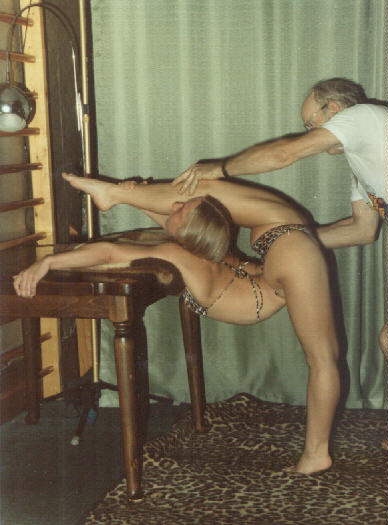
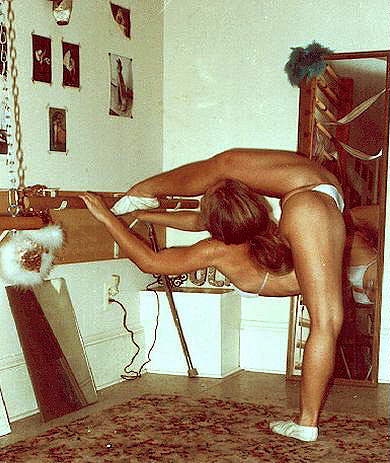
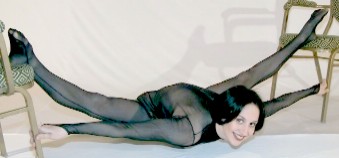
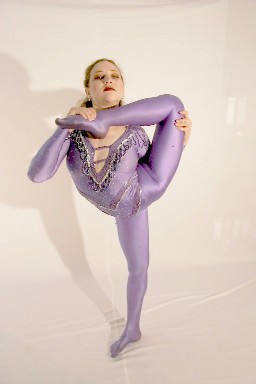
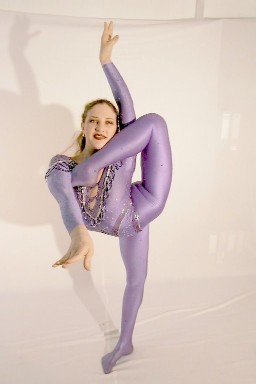
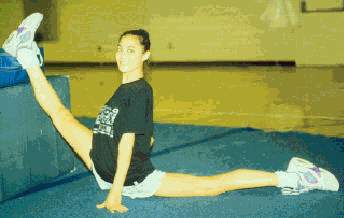
Forward stretch into splits. Bend forward and place the hands around the ankles.
Now push the feet out towards the splits as far as you can then with a 1-2-3-4-5 count push a little bit more trying to get to the position shown above. Return the legs to the start position. Repeat this 15 times.
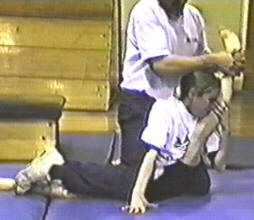
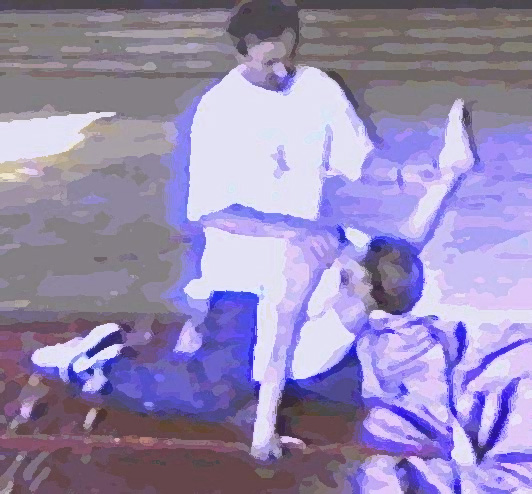
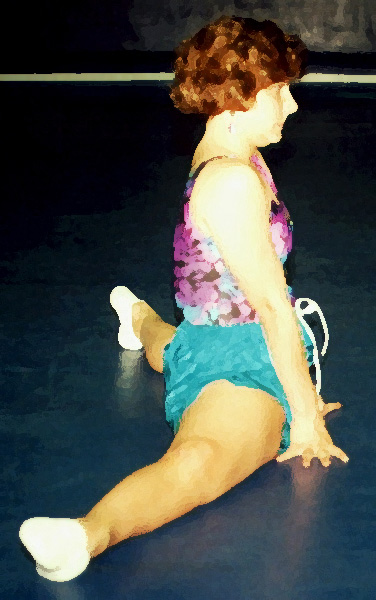
Exercise 3
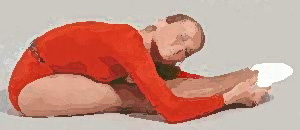
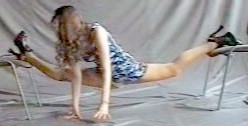
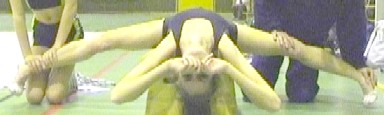
Splits starters and flexing. Slide down into a straddle.
Assisted: Have the assistant to firmly, but slowly push you down into the straddle. Repeat 15 times twice daily if you're having difficulties getting into the straddle.

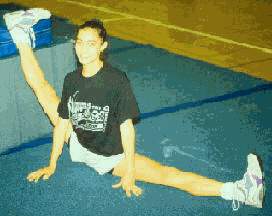
Sit in the straddle.

Slide the hand along the leg and to a 1-2-3-4-5 count try to get the head down to the leg as above. Sit upright and the do this to the other leg. This is one cycle of the exercise. Repeat the cycle 15 times.
Tip: If you have difficulties with getting into the splits or bending to the side in the split in the beginnging you can bend your knee on the opposite side. However try to do the exercise as soon as possible with straight legs.
Tip: When you are as low as you can get into your splits, tension your leg muscles tightly, like you would if you were trying to stand up from the splits, hold the tension for 30 seconds and then relax the muscles completely. When you relax you should find that you are sliding down a bit further.
Always do at least 15 repeats each leg of this for each time you are practicing your splits. Be patient! When you're able to sit in the splits do that it as often as you can. Practice 2-3 times every day. When watching TV, do the splits during the commercials. That makes great 5 minute splits. If you like to continue after the commercials too. In the end you'll find that you can sit in the splits as long as you wish. Another good way getting into the straddle is to put ankle weights around the legs and do a straddle up against a wall. Gravity will naturally pull your legs down slowly and this method is less painful. It should be done twice daily as long as you feel difficulties getting into the straddle and it takes some time, 30 minutes are recommended. When your legs has reached the floor you should always hold the straddle for at least 1-5 minutes or longer. While you're doing this exercise you can always read this handbook.
Exercise 4
Sit down in a frontsplit with left foot forward and hold for a slow 5 count.
Now bend the knee as above till it's completely bent and hold for a slow 30 count. This will increase the stretch radically.
Twist to the front using hand leverage as necessary and sit in a straddlesplit with heels on the floor and toes up and hold for a slow 5 count. Twist into the frontsplit with the right foot forward and hold for a slow 5 count then twist back to the straddlesplit and hold for a slow 5 count. Take a long ten rest count. This is one cycle of the exercise. Repeat the cycle 15 times.
Exercise 5
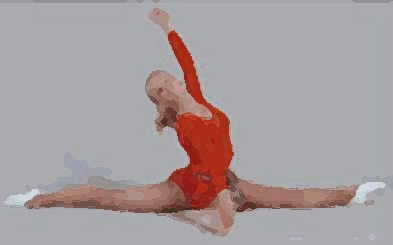
In this exercise you'll be doing a split on the side. In time this exercise easily can develope you an oversplit.
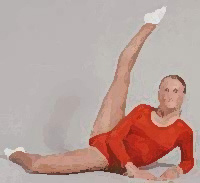
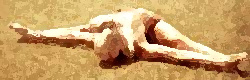
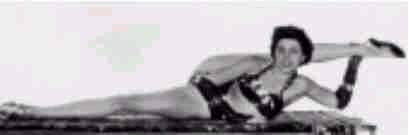
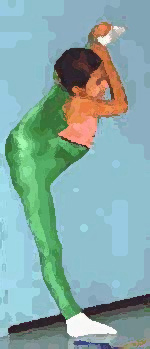
Splits flexing on the back. On your back slightly to the side for balance bring one leg up.
Use the 1-2-3-4-5 count with a swing action to get the foot towards the floor and behind your back Repeat this for the other leg. Repeat the exercise 15 times with each leg.
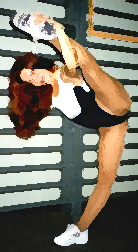
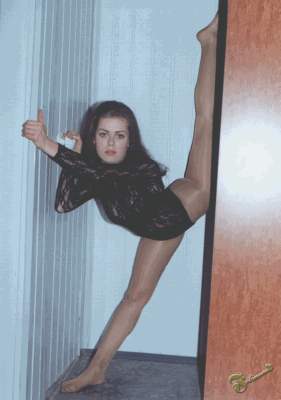
You can also do this exercise standing. Try to combine it with the pointe exercises that you find in the other leg exercises.
If you're not standing en pointe when doing standing splits the leg you're standing on always must be turned out!
Variation 1
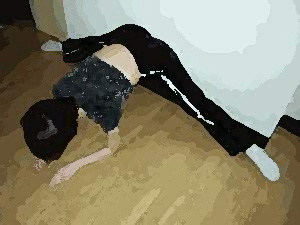
Lie on your back slightly to the side for balance. Bring one leg up. Twist a little to grasp the leg near the ankle with the opposite hand. Steady yourself with the other arm, twisting your body as needed. Pull down to a 1-2-3-4-5 count to get the foot as near to the floor as you can and keep both legs as straight as you can. Repeat this for the other leg. Repeat the exercise at least 15 times with each leg. Note that the intent is to get the maximum leg mobility getting the foot to the floor while keeping the "floor leg" on the floor.
Variation 2
Assisted: Have the assistant to pull down your leg.
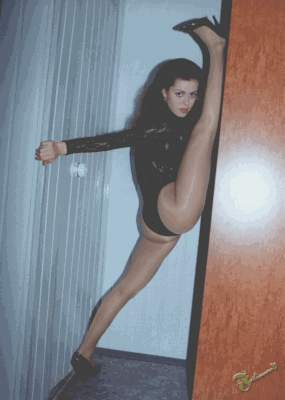
Assisted standing: Have the assistant to pull your leg as shown above.
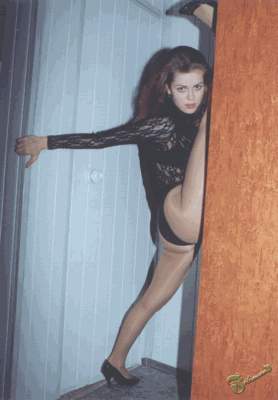
Here are some pictures of the leg pulled very far across the back.
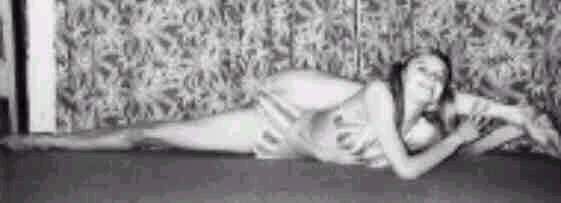
Exercise 6

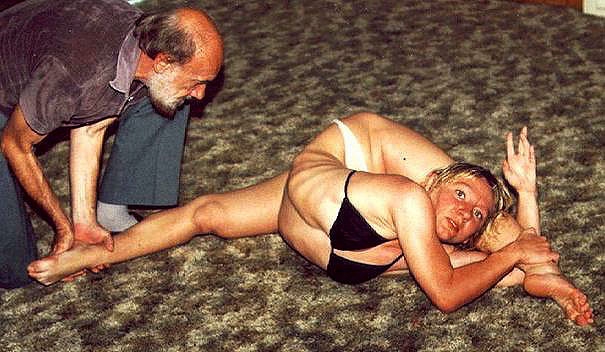
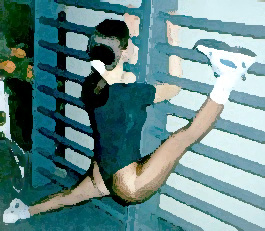
Flat on your back and bring one leg up and grasp it. Pull down to a 1-2-3-4-5 count to get the foot as near the floor in splits as you can. Keep both legs as straight as you can. Repeat this for the other leg. Repeat the exercise 15 times with each leg.
If you feel discomfort in the beginning you can bend your knee as above for a shorter while..
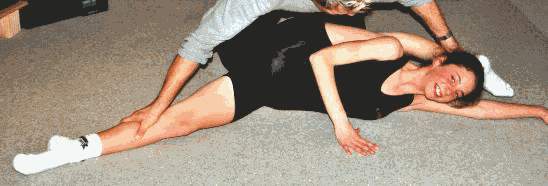
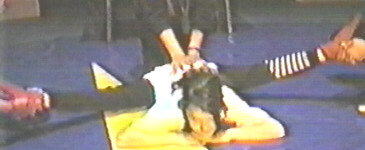
Assisted: Have the assistant sit on your leg and pull down the leg to be stretched. If you feel discomfort in the beginning bend the knee for a shorter while..When the leg is as close to your face as possible hold in this position for 30 seconds and release. Do 15 repeats with each leg increasing the time held with 10 seconds each time. To increase the stretch the assistant can either sit on your thigh or hold it.

If you prefere it you can also stand and have the assistant lift your leg as shown avoce.
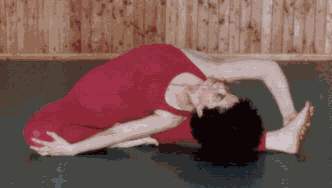
Variation
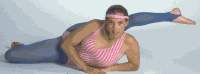
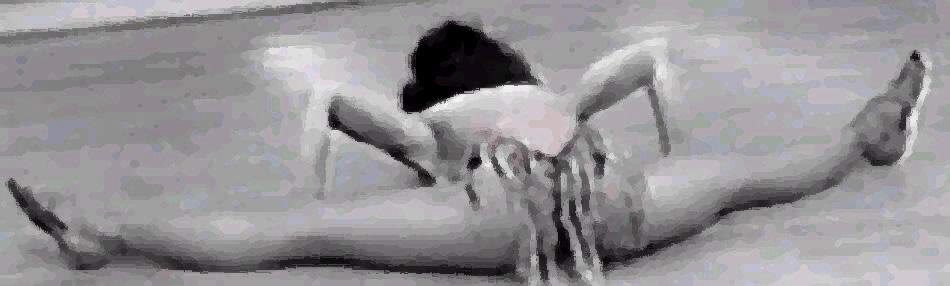
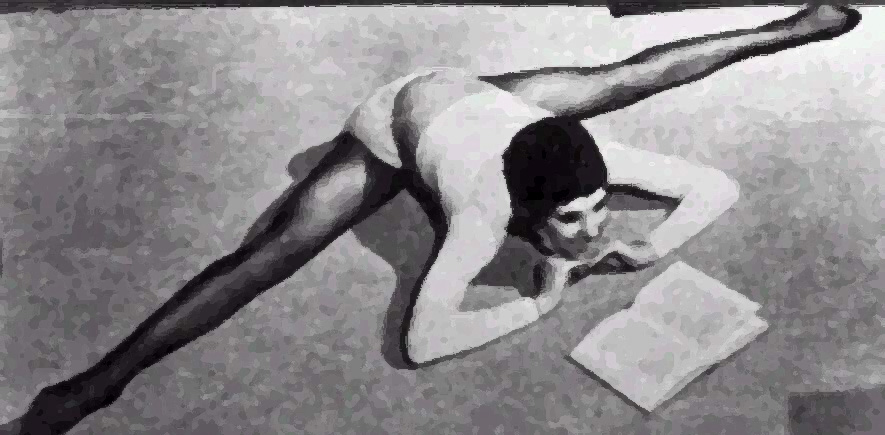
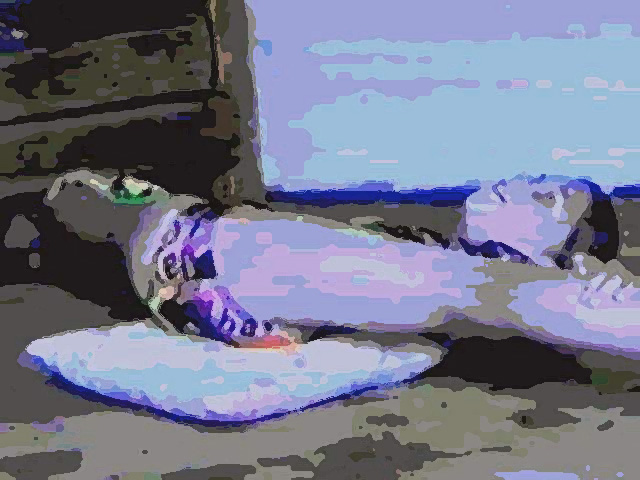
Legs in the splits and reach along the leg 1-2-3-4-5. Repeat other leg. Get the chin to the floor and use the arm not holding the leg to remain in balance. Legs in the
splits and face right to the floor.
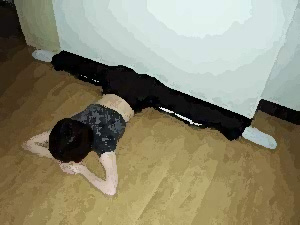
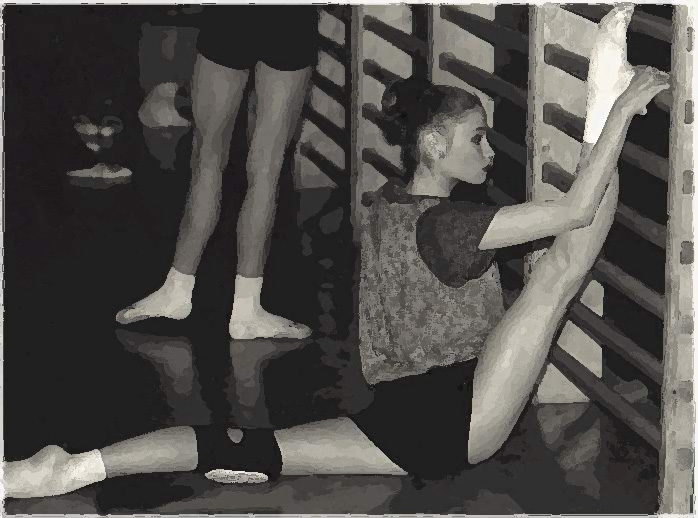
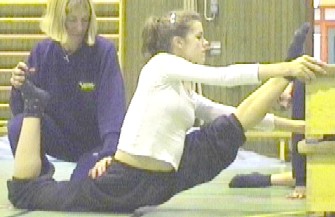
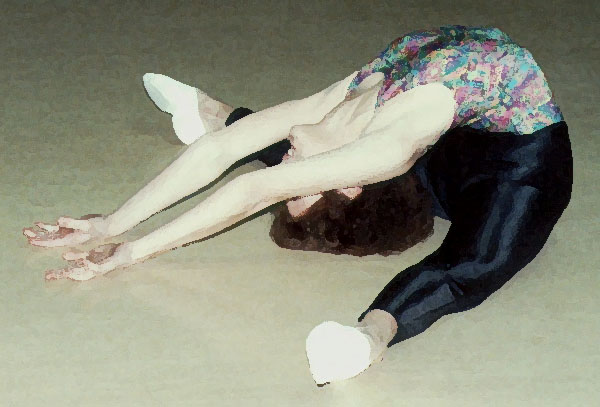
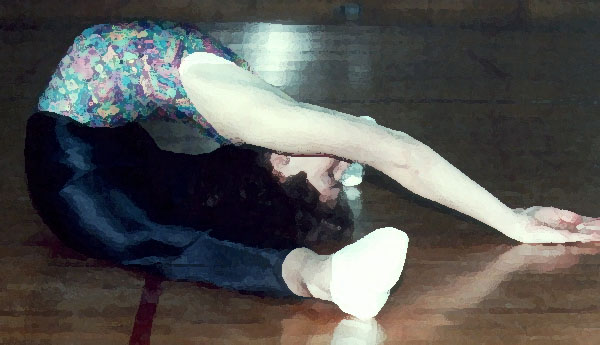
Exercise 7
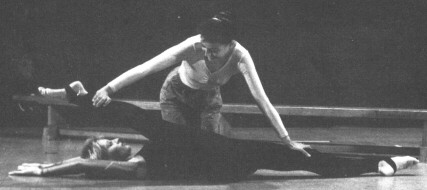
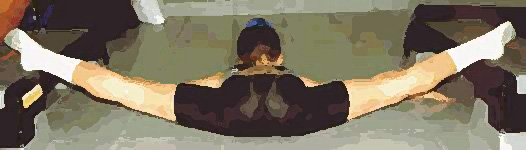
Sit in a comfortable straddle. This may be a bit wide at the start so legs comfortably apart is where you should be. Place the hands on the floor for support (as an alternative you can slide them to the front for a better stretch) and lean forward bringing the head and body down to a 1-2-3-4-5 action as near to the floor as you can. Do this 15 times.
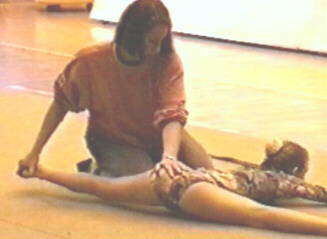
Assisted: Have the assistant to take your hands and pull you to the front.
Exercise 8
Preparation
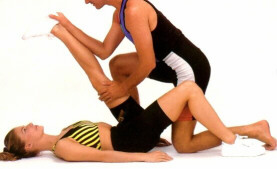
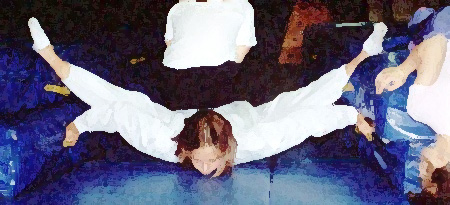
Lie on your back with your arms either as shown or more to the side for better balance. Raise the legs and to a 1-2-3-4-5 bounce action try to get them to the floor in the perfect cut split position as shown. Note the toes upwards. If you can get to the floor with the feet, hold the position for a 1-2-3-4-5 count.

Assisted: Have the assistant hold your legs down to the floor in this position one minute for 15 times. To increase the stretch even more the assistant can stand on the thighs so that the whole of the legs will be on the floor.
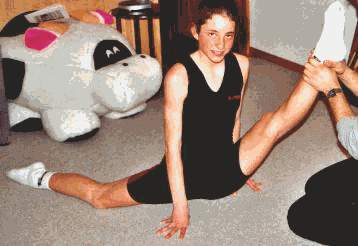
Exercise 9
Preparation for oversplits 1
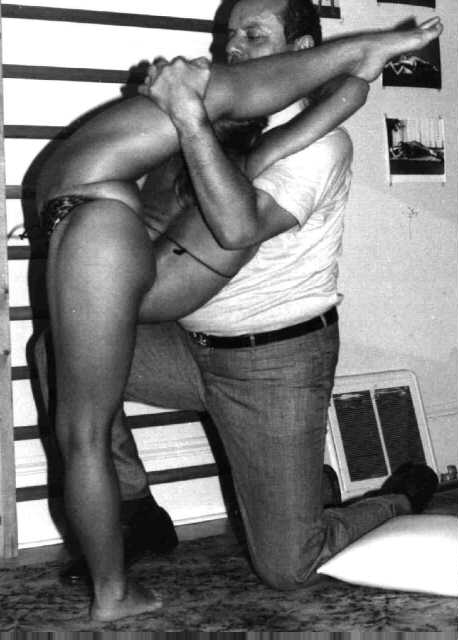
This preparation exercise can only be done assisted. Lie on your back having one knee bent. Have the assistant to pull your other leg up as shown above for 15 times holding for 30 seconds and increasing the time with 10 seconds for each repeat.
Preparation for oversplits 2
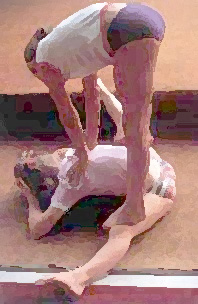
Sit in a split. Put your hands under the knee, interlock them and pull the knee upwards to what is shown above. Stay there for a slow 1-2-3-4-5 count and then pull the knee upwards a bit more.

Bend your back as far back as possible with the knee bent. Do 20 repeats never going out of the split and if possible with the knee bent at all times.
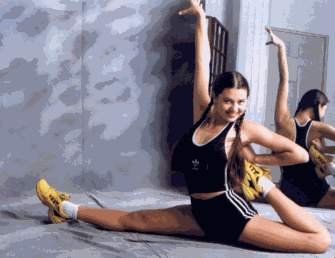
Exercise 10
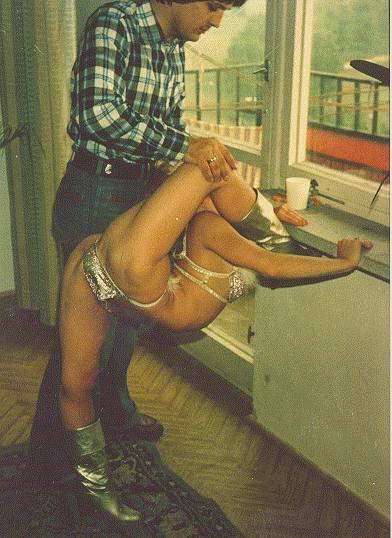
For this exercise you will need to have a solid object about 20cm high or higher (increase the height with as your muscles stretch)! Put one foot up on the object and to a 1-2-3-4-5 gentle bounce try to sit on the floor. Use the hands for support. Try to get the front leg as close as possible to a vertical position while sitting with your whole rear leg on the floor and your hip to the floor. Change feet around and repeat the exercise. Continue until you have completed 15 exercises with each leg to the front.
Assisted 1: Use an object as described above and increase the height as your muscles stretch. Put one foot up on the object and sit in a split and use the hands for support. Have the assistant to by applying firm pressure to your seat or the thighs (as shown above) push you down till you sit on the floor and then hold you there for at least 1 minute. Still holding you on the floor the assistant should bend your rear leg as shown above to increase the stretch and hold for 30 seconds. Increase the height of the object until the front leg is as close as possible to a vertical position. Change feet around and repeat the exercise. Continue until you have completed 15 repeats with each leg to the front and continue to the next assisted stretch or exercise 11.
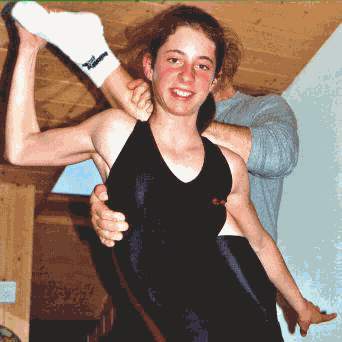
Assisted 2: The assistant should lift your front leg up from
split as shown above. It’s possible to lift the leg until it is vertical.
Assisted 3: The assistant should sit on your rear leg and lift your front leg up from split as shown above. It’s possible to lift the leg until it is vertical.
You will very soon find that it's possible to put an object under both legs to get the maximum possible oversplit and that it will be comfortable.
If possible you can use different furniture to do this exercise. Let your imagination flow.
Exercise 11
Do this exercise only after being sucessfull with the exercises above, splits exercise 10 and the backbend exercises necessary
Sit in the splits with front toe up and rear toes down (not on the side). Use a suitable object that you can rest the front foot on that is high enough to require a stretch to sit on the floor. With a bounce 1-2-3-4-5 sit on the floor and use the hands for balance. Then bend the knee of the rear leg to increase the stretch and hold the position for 30 seconds. When you feel comfortable change the object to a higher one until you're able to sit on the floor with the front leg raised to a vertical position as shown above.
Assisted: Have the assistant lift your leg up from split till the leg is vertical as in the exercise
above.
Variation: You can also do this exercise having your rear leg on an object as shown above.
When you sit on the floor bend back to try to get the head to the seat. Use your hands to provide support and balance.

Now bend the knee to increase the stretch for a 1-2-3-4-5 count and hold the position for 1 minute. Try to get the front leg as close as possible to a vertical position. Change legs so that the other foot is to the front. Do this 15 times with each leg.
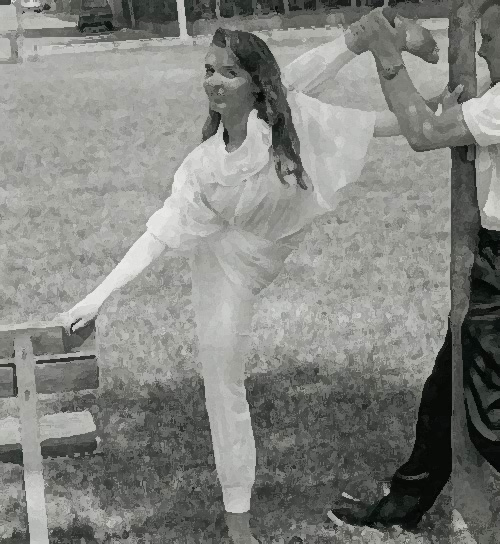
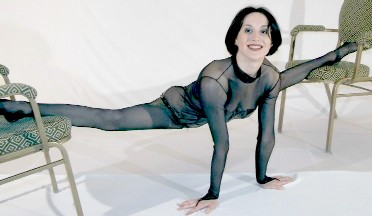
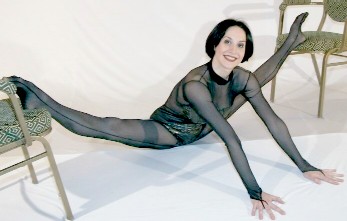
You will very soon feel that you need to put an object under both legs to get the maximum possible oversplit. A good suggestion is to use two chairs as shown above by Natasha.

This exercise can also be done standing as shown above.
Assisted variations
At this level of flexibility assisted stretches are recommended to do. You might find them slightly unpleasant to in the beginning, but that disappeards quite soon and at that stage most people think that they are pleasant and prefere to do assisted stretches. You will find that this is a quickest and best way to achieve maximum oversplits.
When doing assisted oversplit the assistant should stretch the leg slowly as far as possible, hold the stretch at least 1 minute and then release the stretch a bit and stretch again. An example: If the assistant stretches your legs into a 220 degrees oversplit he should hold the position there, release the stretch to 200 degrees, then again stretch to 230, hold, release to 210 degrees, stretch to 240 degrees, hold, release to 220 degrees and so on til the maximum oversplit is reached.
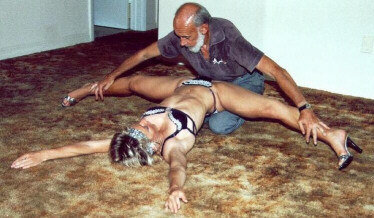
Have the assistant holding the front leg as far up as possible and pull you backwards towards the rear leg and hold the position for 1 minute. Lying down on the rear leg is possible. Always stay in the splits or oversplits position! Do at least 15 repeats with each leg.
In a standing position lean on something and have the assistant to firmly push your rear leg as far as possible into an oversplit as shown above and hold it for 1 minute.
After that bend the knee of the rear leg and let the assistant should firmly push your leg as far as possible into the oversplit and hold there for another minute. Do at least 15 repeats with each leg. Always stay in the splits or oversplits position between the repeats!
Lying on the side and holding the rear leg as close as possible to your back have the assistant pull your front leg as far as possible into an oversplit as shown above and hold the position for 1 minute. Always stay in the splits or oversplits position between the repeats! Do at 15 repeats with each leg.
Stand in a split, bend backwards and lean on your assistant. Have the assistant pull your rear leg toward him as far as possible into an oversplit and hold the position for 1 minute. Do at least 15 repeats with each leg. Always stay in the splits or oversplits position between the repeats!
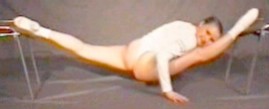
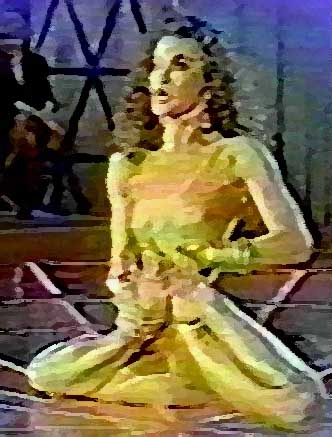
Here is something to aim for, a 270 degrees oversplit, performed by Lisa and Urszula. It will come quicker than you think...

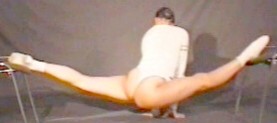
...and with assistance and after doing all splits and leg exercises to Elzbieta's 305 degrees oversplit. This is as far as it's possible to go and requires a partial dislocation of the rear leg.
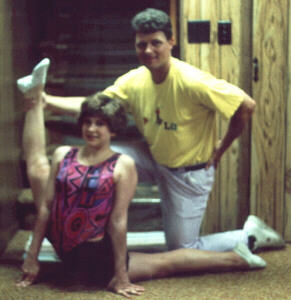
Exercise 12

Here too you will need to have a solid object about 20cm high or higher (increase the height as your muscles stretch)! Put one foot up on the object and to a 1-2-3-4-5 gentle bounce try to sit on the floor. Use the hands for support.
For mor support and to increase the stretch bend forward. While reaching forward tension your muscles and move your feet so that the toes point forward. Relax and move the feet so that the feet point up. Change feet around and repeat the exercise. Continue until you have completed 15 exercises with each leg up on the object.

Assisted: Have the assistant hold one hand on your back and lift the leg up. It’s possible to lift the leg at least 50 degrees and often until it is vertical.
Exercise 13
Use a couch or two soft chairs or two chairs with padding. You will need something to steady you. The couch has this. If you use chairs you can place a chair in front of your body to steady you if you need it. With your toes pointing up bounce down to a 1-2-3-4-5 count. The goal is to reach the floor and get an as deep oversplit as you can and at the same time stay erect with a straight back. Repeat 15 times. When you can't get a deeper oversplit change chairs, couch or put something under to get the legs up higher.
Assisted: Have the assistant to lift the legs up as shown above.

When you sit comfortable on the floor in the oversplit place the hands on the floor for support (as an alternative you can slide them to the front for a better stretch) and lean forward bringing the head and body down to a 1-2-3-4-5 action as near to the floor as you can. Do this 15 times.
Assisted: Have you feet on something. The assistant should firmly push your hip downwards till it reaches the floor and then help you lean forward towards the floor.
Variation
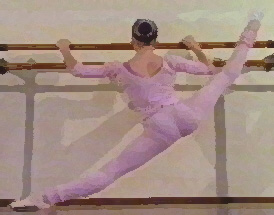
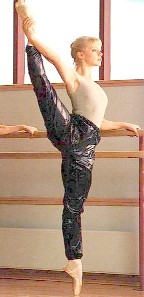
Standing at a barre raise one leg to the side and lay it on the barre. Hold yourself as close to the barre to get the legs into split position and to a 1-2-3-4-5 count bounce towards a sitting position on the floor. Do 15 repeats and change legs.
Exercise 14
Variation 1
In this exercise you're going to train overstraddles. Lie down on the floor on the back with a firm cushion about 15cm thick (or anything else you like that will let you do this exercise) under the seat. Have your feet vertical. Split the legs by bringing them toes towards the floor. To the 1-2-3-4-5 gentle bounce try to get the toes to the floor. Legs back to vertical and repeat the exercise 15 times.
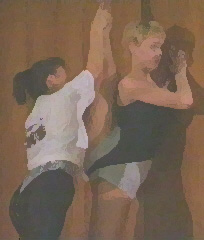
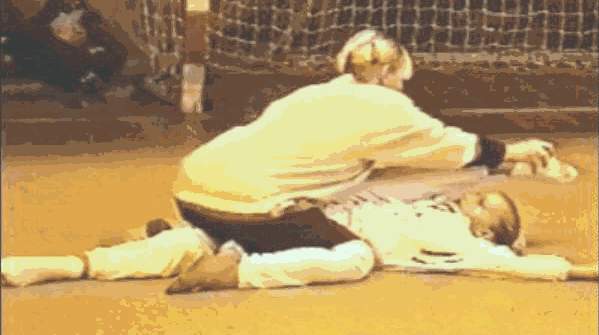
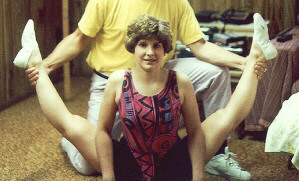
Assisted 1: For preparation you can have the assistant keep your hip to the floor and firmly lift your leg. When reached the maximum level of flexibility at this time hold the position for 30 seconds, release and repeat for 15 times increasing the time held in the positions with 10 seconds each time.
Assisted 2: Have the assistant to firmly push your legs towards the floor as shown above. When reached the maximum level of flexibility at this time hold the position for 30 seconds, release and repeat 15 times increasing the time held in the positions with 10 seconds each time.
Assisted 3: Sit in a straddlespli and have the assistant put his legs towards your seat and firmly pull your legs towards him as shown above. When reached the maximum level of flexibility at this time hold the position for 30 seconds, release and repeat 15 times increasing the time held in the position with 10 seconds each time. Always stay in the straddleplits or overstraddles position between the repeats!

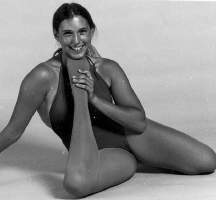
Here are some overstraddles after some of doing this exercise.
…and this is the overstraddle you should strive for
At this level if you're good enough at the backbends you can also combine this position with a backbend as above. It will give you more stability and increase the stretch.
Variation 2
Preferably use two soft chairs or two chairs with padding to do this exercise. Bounce to the 1-2-3-4-5 and try to oversplit to the floor. Use hand support (or elbows) to take the weight for a 5 count rest as in the picture to the right and then repeat the stretch. Again, if you are able to sit you will need to add more height. Do this 15 times. Keep your toes to the front throughout the exercise as shown in the right picture.
Assisted 1: Put your legs on two chairs as above and have the assistant to firmly push you down. When reached the maximum level of flexibility at this time hold the position for 30 seconds, release and repeat for 15 times increasing the time held in the positions with 10 seconds each time.
Assisted 2: Have the assistant either to push you down or to lift the legs up as shown above.
Exercise 15

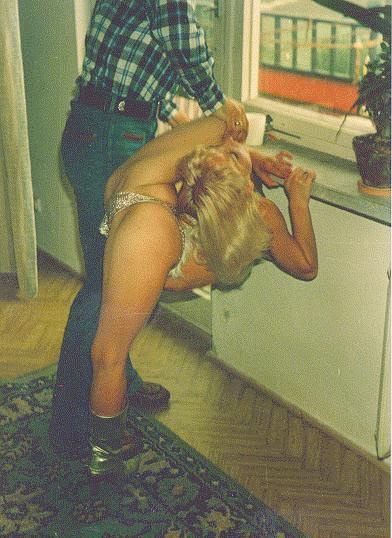
In this exercise you will do a split with a backbend.

Raise the head a little and try to get the head to the floor outside the knee. Use the hands wherever is comfortable to maintain balance. Do this 15 times.
Assisted: Have the assistant to pull you backwards towards the leg.
When you are good at this position you can try the one above which includes a split, twisted backbend and a partially twisted rear leg. It will train your balance and flexibility and at the same time prepare you for dislocating the legs since you'll be able to twist less the more you do it and still be able to put the rear leg under the opposite armpit. Start with standing in a split with your back bent and the rear leg behind as show above by Jaqueline.
Now grab your rear leg, move it over your head and under the chin and twist your back still staying in the backbend.
Twist even more until you're able to put the foot under your armpit and put the arm in a position locking the foot under the armpit. Repeat 20 times with each leg and in the last repeat stay for as long as you can.
Exercise 16
This is a more advanced oversplit exercise. Doing it you will be capable of partially dislocating the hip socked and it will prepare you for something many call crazy splits, but most important to more advanced yoga asanas where a full dislocation is necessary. For this the hip socket must almost come out of joint to get the movement required.
For this you will need to prepare already when doing the oversplit and overstraddle exercises. This is easily done by changing between the oversplits and overstraddles without going out of the oversplit/overstraddle as shown above by Gosia. You should do this for 15 times after doing both types of splits. This will prepare you for this exercise and make it easier. You will have to to force or strain the hip joints in the process and feel a bit discomfort, but that is necessary in the beginning and you shouldn't be worried. Anyone can become able to hip dislocate and with dislocation they are then able to do this exercise with ease. Doing the oversplit exercises over and over again here will help you getting there and then your dislocating hips will allow you to do this. During the exercise you must be completely relaxed in the leg and let the leg rest while moving.
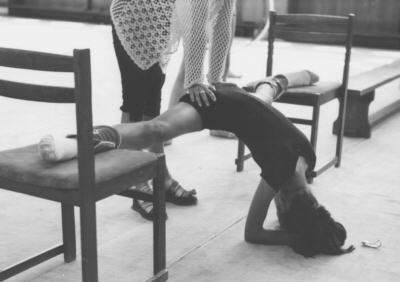
You start by doing the front split with the heel up on a chair or similar and lower into the front split sitting on the floor with the leg raised and the rear leg flat behind you. In this position the hip is on its way out. This can feel a bit odd the first times, but stay relaxed and don’t try to move the leg.
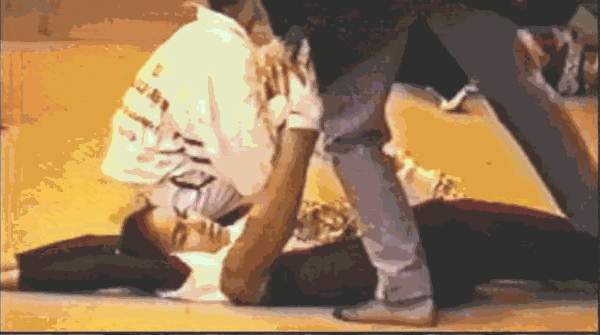
Then, keeping the raised foot vertical, and still sitting firmly on the floor, very slowly turn the body through 90 degrees so that the leg up is now to the side. The hip socket will move out a bit more to not quite complete dislocation and you might hear popping and clicking sounds, but this is normal. The new position will be a very oversplit to the side. Repeat at least 20 times with each leg and if possible 2 or 3 times each day (a recommendation is in the morning, at lunch time and in the evening). If you feel you can do a deeper oversplit change chairs, couch or put something under to get the legs up higher.
Assisted: Assisted stretches are highly recommended until your joint comes out of it's socket with ease. They are also necessary, because they also prevent you from stopping at an early point (even if you wouldn't use assisted stretches never stop at an early point). If you're hypermobile continue with the assisted stretches beyond a full dislocation. Have the assistant to hold the leg while you turn the body. Then have the assistant raise the leg up as far as possible, hold and down again and rotate the leg 90 degrees to each side back and forth (it's possible to rotate the leg 180 degrees!) until the stretch and dislocation feels comfortable. This might take time, but will loosen your joint even more and give a good stretch. To make the stretch even better the assistant can also slowly pull your leg backwards and upwards 30-50 degrees while rotating the leg as mentioned above. This time the rotation can easily be beyond 180 degrees each direction and eases the dislocation. Another way to increase the stretch in the dislocation is to start in the oversplit to the front, raise the front leg to a vertical position and then move it to the side (left leg to the left side, right leg to the right side) and then back again as many times as necessary. If you train together with a partner of a different gender, and you wish to be at the same leve
l at all times the male partner should always be assisted. Then hold the stretches longer and to the same level as you if you're the female partner. Do this secquence of assisted stretches as many times as necessary to get the hips dislocated with ease and if possible 2 or 3 times each day (a recommendation is a sequence in the morning, at lunch time and in the evening).

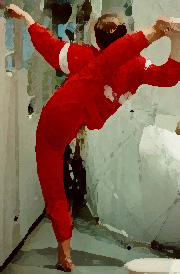
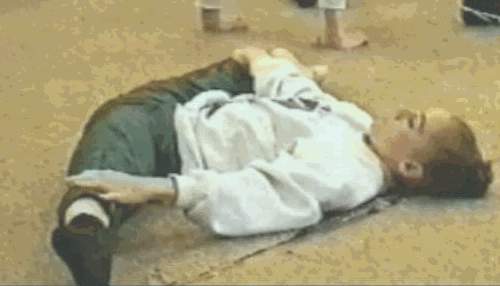
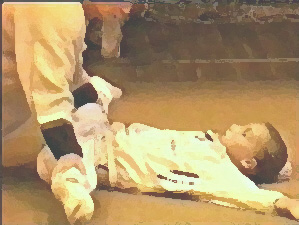
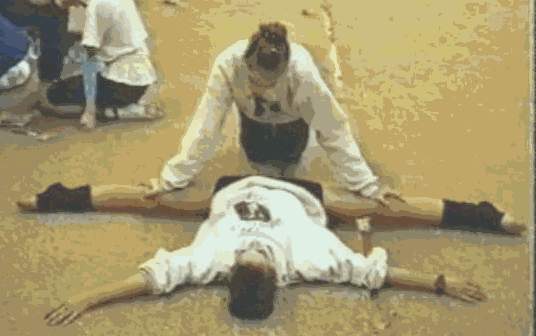
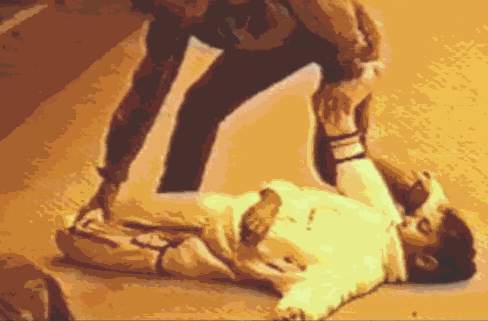
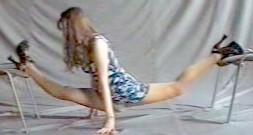
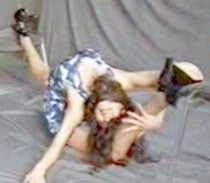
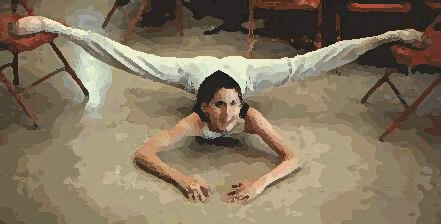
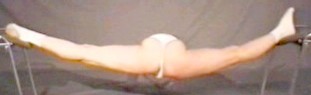
Doing the dislocated oversplit exercise daily will help you to do poses like the above (try them the better you get) and many other advanced yoga asanas that require dislocations easily and quickly.

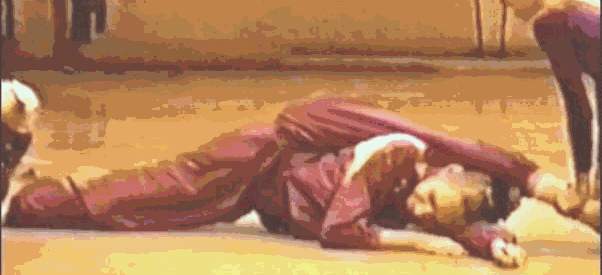
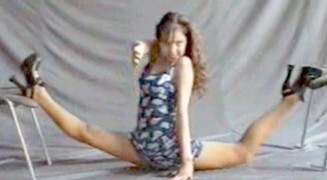
When you get good enough and can master the dislocations with ease feel free to experiment as much as you like. This is Pierre doing full controlled dislocations. It took him 6 months from beginning doing the dislocated oversplit exercises to achieve this level of flexibility.
Important notice! If you have suffered from one or many dislocations in either hips or shoulders you should learn to do controlled dislocations. This often is a symptom of hypermobility and you will sooner or later dislocate again. A medical term for this is Ehlers-Danlos Syndrome, but often this disease is missed by most MD’s unless it’s mentioned. Around 40% of the population has Ehlers-Danlos Syndrome and often without knowing it. The symptoms are often pain in joints, hypermobility and dislocations of the joints (for example if you can learn how to do a split in a short time, partially dislocate your shoulders - that often means that you will hear a popping or cracking sound - or if you have overbent elbows you most likely have Ehlers-Danlos Syndrome). Very often the symptoms show gradually, often with pain or dislocations, and increase with time to states that aren't controllable. It's not a question if it happens, but when. To prevent this it’s important to learn to do controlled dislocations, build up strenght and flexibility around all joints and practicing yoga and contortion does all this. The reason is simple. If a symptom like a dislocation occurs and it isn’t controlled your muscles will go into spasm. Being able to do a controlled dislocation prevents this and it should be done many times on a daily basis. A controlled dislocation is a dislocation where you are able to dislocate the joint, move the limb with the help of another limb or with help from someone that assists you and then putting it back to it's normal state. All joints that can be dislocated must be trained in this order of fashion and the controlled dislocation must become a part of your normal range of movement! It's important to train all joints that dislocate, because that you once had an uncontrolled dislocation in i.e. the hips doesn't mean that the next won't be in the shoulders etc and the dislocations gradually worsens for each time making it impossible to control them in the end. You should work the same way with backbends and later backfolds since the dislocations tend to spread to other areas than the joints around the limbs. When working on backbends and especially backfolds put a stick, a finger or something appropriate to increase the fold and partially dislocate the vertebrae. The last part is very important! Using the contortion barre is recommended. Persons that have experienced or experiences symptoms like dislocating, pain in joint and hypermobility should work towards being able to do all of the program to perfection, as a prevention, to be able to get the joints and the muscles around the joints supple to the outer limit and learn to control them in situations like this by doing controlled dislocations as much as possible. Also all exercises, if possible, should be done assisted with firm stretches until the maximum suppleness is reached at least once each day, preferrably more! This might be difficult, uncomforable and even painful, but only in the beginning. It’s not as difficult as it sounds and that is something you’ve probably found out by now or will.