Shoulders
In this section you will limber up you shoulders and with time have full movement range and be able to do shoulder dislocations. If you have had any shoulder dislocations, can do them or are close to be able to do them please read the introduction to shoulder dislocations and the important notice below very carefully.
Exercise 1
This exercise is the same as in the warmup. The difference is that in the stretching exercise you're supposed to grasp the hand/arm higher and higher until you can hold your wrist or even above it. This will give a good stretch and also give you very supple shoulders. Now put your left arm down your back as far as you can. Bring right arm up your back from below. Using a 1-2-3-4-5 count, push left down and right up. Change arms and repeat. Do 20 repeats with each arm at the top.
Assisted: Have the assistant to pull your upper arm down and the lower up, if possible til there's a dislocation. If the shoulder dislocates the assistant should hold the position for at least 30 seconds and continue the stretch as far as possible in each repeat.
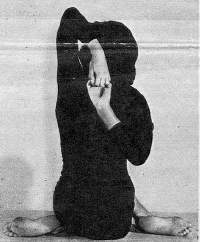
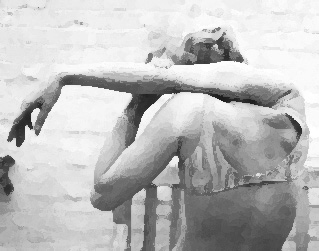
Exercise 2
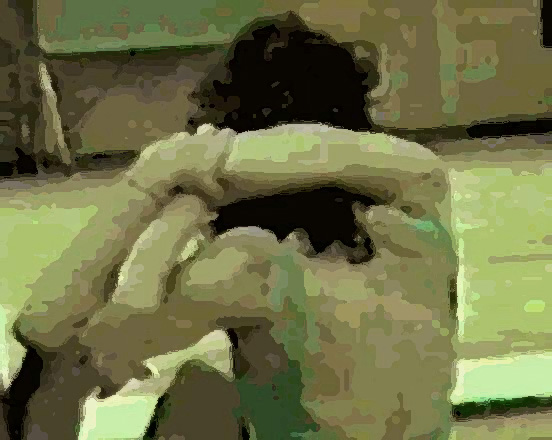
This exercise is very easy, but will take time to learn to do. Sit on the floor with your holding the hands behind the back as in the picture above.

Now lean backwards keeping your arms straight. Hold your thumbs for support and slide down the floor as far as you can. Repeat this exercise at least 10 times and don't worry about dislocations. This exercise improves your range of movement, but only dislocates the joints partially.
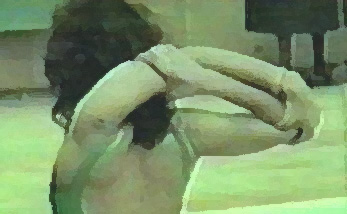
This is Jaqueline in the last repeat of this exercise. As you can see the most important thing is to stay relaxed.
Assisted: Have your assistant to help you keep the arms straight, keep your hands together and stretch, if possible til there's a dislocation. If the shoulder dislocates the assistant should hold the position for at least 30 seconds and continue the stretch as far as possible in each repeat.

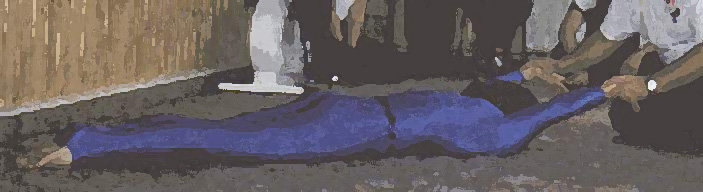
Another way is kneeling as above and let the assistant stretch your shoulders as shown above. Don't stop until your hands touch the floor. They will be do after some time. If the exercise is done assisted repeat it 30 times holding for 20 30 seconds and stay in the position for 2 minutes when doing the last repeat.


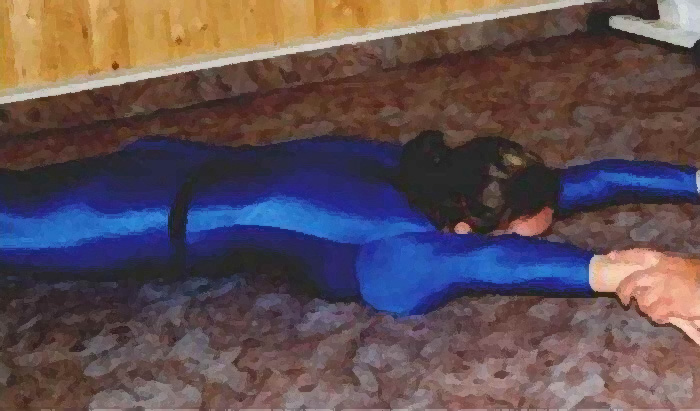
If you prefer it you can also lie on your stomach and let the assistant stretch your arms the same way as in the exercise. Also here you shouldn'y stop until your hands or if possible the whole of the arms touch the floor. If the exercise is done assisted repeat it 30 times holding for 20 30 seconds and stay in the position for 2 minutes when doing the last repeat.
You probably expect that you will feel the partial dislocation (or sometimes even a full dislocation), but the fact is that in time with this range of movement this will feel like any normal move. It's all about believing.
An introduction to dislocations of the shoulders

When you're going to limber up your shoulders you'll come to the point either when they will be partually dislocated or fully dislocated. Ever wanted to learn how to do shoulder dislocations? Then read this first. You have probably already done partial dislocations when you've done exercise 1 and 2 and found out that this is nor difficult, dangerous or unpleasant to do.
Shoulder dislocations has been used as a party trick and act for ages now. Something that is a fact as you probably know from doing the shoulder exercise 1 is that the shoulders get very supple and feel much more loose. This helps you if you want to dislocate the shoulders. Dislocating the shoulders isn't dangerous at all, but it has to be controlled. The feeling when the shoulders are dislocating is that you feel and hear popping and clicking sounds as the arms slide out of the shoulder sockets, then slide back into them again. Of course you have to limber up your shoulders to do this, you cannot do it right off or you would injure yourself.

Also do the stretch shown in the picture above using a 1-2-3-4-5 count for 15 repeats.
During any dislocation have the muscles around the joint relaxed.

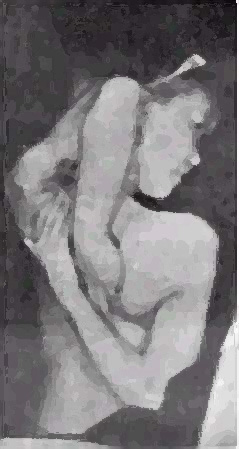
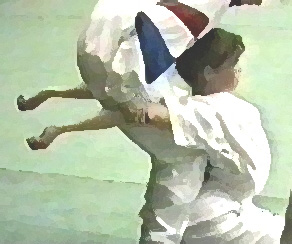
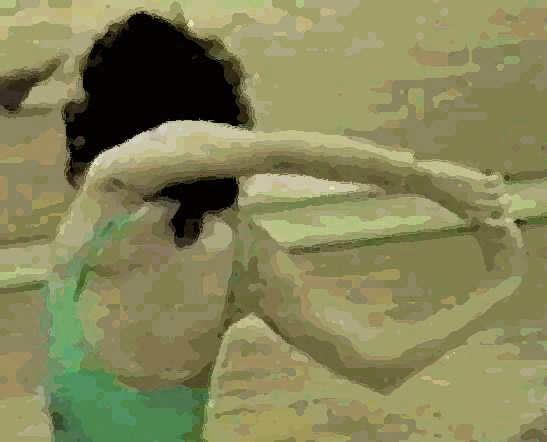
Another way of controlling the dislocated joint is to hold your elbows with your hands as above. This makes it easy for you to move the arms back and forth dislocating each time you move the arms to either left or right. Remember that you should relax the limb that is moved out of it’s socked. One of the shoulders might be less flexible than the other. Do as with all other stretches. Do the double amount of repeats on it.


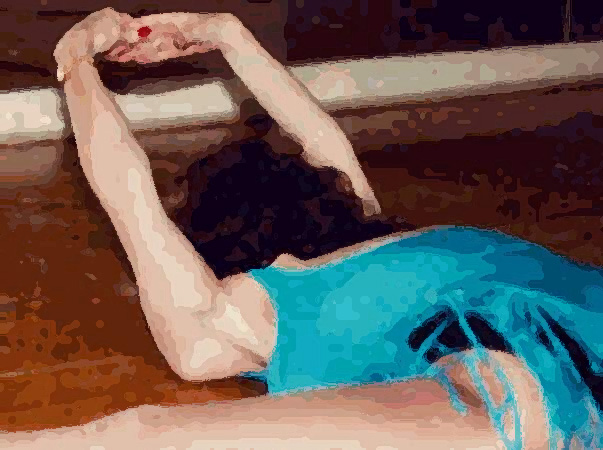
Again here is Jaqueline demonstrating her dislocation. She uses a very similar technique to the shown above, but then it changes. She starts off with holding her elbow with her hand and pulling it until the arm dislocates (which easily can be seen here). Then she straightens the elbow making it possible for her hand to slide towards the hand of the dislocated limb and making it possible to grip the hand and pull downwards making the dislocation complete. In the process the arm has rotated a few degrees increasing the dislocation even more. As you can see the dislocations of the shoulders can be made in many different ways and I've shown the most usual. The most important however is to stay relaxed.
You will need to force or strain the shoulder joints in the process and feel a bit discomfort, but sometimes that is necessary in the beginning and you shouldn't be worried, because in time you'll be able to dislocate the shoulder joints with ease. Therefor assisted stretches are recommended in the beginning until your joint comes out of it's socket with ease, but also to prevent you from stopping at an early point. If you're hypermobile continue with the assisted stretches beyond that. Also if you train together with a partner of a different gender, and you wish to be at the same lever at all times the male partner should be assisted. Then hold the stretches longer and to the same level as the female partner (in this case till the dislocation occurs).
Important notice! If you have suffered from one or many dislocations in either hips or shoulders you should learn to do controlled dislocations. This often is a symptom of hypermobility and you will sooner or later dislocate again. A medical term for this is Ehlers-Danlos Syndrome, but often this disease is missed by most MD’s unless it’s mentioned. Around 40% of the population has Ehlers-Danlos Syndrome and often without knowing it. The symptoms are often pain in joints, hypermobility and dislocations of the joints (for example if you can learn how to do a split in a short time, partially dislocate your shoulders - that often means that you will hear a popping or cracking sound - or if you have overbent elbows you most likely have Ehlers-Danlos Syndrome). Very often the symptoms show gradually, often with pain or dislocations, and increase with time to states that aren't controllable. It's not a question if it happens, but when. To prevent this it’s important to learn to do controlled dislocations, build up strenght and flexibility around all joints and practicing yoga and contortion does all this. The reason is simple. If a symptom like a dislocation occurs and it isn’t controlled your muscles will go into spasm. Being able to do a controlled dislocation prevents this and it should be done many times on a daily basis. A controlled dislocation is a dislocation where you are able to dislocate the joint, move the limb with the help of another limb or with help from someone that assists you and then putting it back to it's normal state. All joints that can be dislocated must be trained in this order of fashion and the controlled dislocation must become a part of your normal range of movement! It's important to train all joints that dislocate, because that you once had an uncontrolled dislocation in i.e. the hips doesn't mean that the next won't be in the shoulders etc and the dislocations gradually worsens for each time making it impossible to control them in the end. You should work the same way with backbends and later backfolds since the dislocations tend to spread to other areas than the joints around the limbs. When working on backbends and especially backfolds put a stick, a finger or something appropriate to increase the fold and partially dislocate the vertebrae. The last part is very important! Using the contortion barre is recommended. Persons that have experienced or experiences symptoms like dislocating, pain in joint and hypermobility should work towards being able to do all of the program to perfection, as a prevention, to be able to get the joints and the muscles around the joints supple to the outer limit and learn to control them in situations like this by doing controlled dislocations as much as possible. Also all exercises, if possible, should be done assisted with firm stretches until the maximum suppleness is reached at least once each day, preferrably more! This might be difficult, uncomforable and even painful, but only in the beginning. It’s not as difficult as it sounds and that is something you’ve probably found out by now or will.